
Freight train brake diaphragm failures often cause air loss, weak braking, and unexpected delays. Crews need fast, safe ways to confirm leakage before it affects train movement. A structured inspection helps locate the problem, protect personnel, and reduce repeat failures in locomotive and freight brake systems.
- Listen for hissing near brake chambers and related pneumatic fittings.
- Watch for frequent compressor cycling during charging.
- Check reservoir pressure stability after charging the system.
- Inspect diaphragm areas for cracks, hardening, or deformation.
- Confirm brake pipe leakage through approved test procedures.
- Use calibrated gauges for all pressure checks.
- Isolate the pneumatic circuit before any repair work.
- Apply lockout tagout before opening any brake component.
- Replace worn diaphragms with genuine locomotive brake parts.
| Common Symptom | Likely Cause | Corrective Action |
|---|---|---|
| Hissing near brake chamber | Damaged brake diaphragm | Isolate, depressurize, and replace the diaphragm |
| Frequent compressor cycling | Air leakage in brake circuit | Perform leakage test and inspect sealing points |
| Unstable reservoir pressure | Internal or external air loss | Check valves, fittings, and diaphragm condition |
| Weak brake response | Diaphragm not holding pressure | Replace with correct genuine locomotive part |
| Repeat cold-weather leakage | Hardened or shrunken seals | Inspect seals and use approved replacement parts |
You fix freight train brake diaphragm problems by spotting air loss early. Then, confirm the issue with required leakage tests.
Listen for hissing at brake chambers. Watch compressor cycling during system charging. Check if reservoir pressure remains stable after charging.
Charge the brake system as specified. Make the required brake reduction.
Then verify that leakage remains within approved limits. Follow applicable AAR and FRA inspection requirements for freight train brake systems.
Before repair, isolate the pneumatic circuit. Apply lockout tagout procedures.
Confirm zero pressure with a calibrated gauge before opening any component. Never remove brake parts while pressure remains in the system.
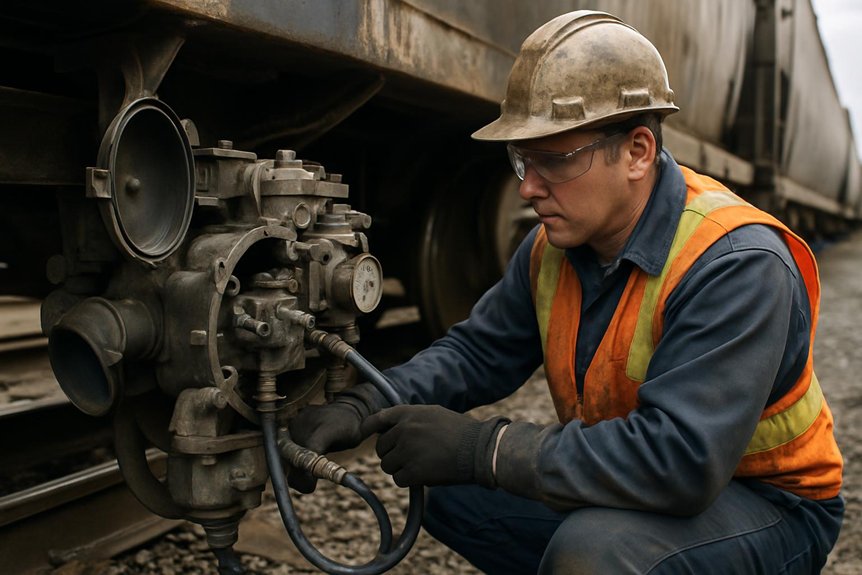
Inspect the brake diaphragm for cracking, stiffness, tearing, or deformation. Also check adjoining seals, fittings, and brake chamber surfaces.
Replace defective parts with genuine locomotive brake components.
Cold weather can worsen diaphragm and seal problems. Low temperatures may harden rubber parts and reduce sealing performance.
Include cold-weather seal checks during scheduled brake inspections.
Mikura International supplies and exports genuine locomotive and marine engine parts. We supply parts from trusted brands such as ALCO, EMD, GE, and WABCO.
We are not the manufacturer. We support locomotive brake maintenance with genuine replacement parts for reliable service.
Key Takeaways
- Identify diaphragm failure by hissing, excessive compressor cycling, unstable reservoir pressure, brake warnings, or corrosion around brake chambers.
- Confirm leakage by charging the system, making a 20-psi service reduction, and checking loss against the 5-psi-per-minute limit.
- Isolate the affected pneumatic circuit, apply lockout tagout, and verify zero pressure before loosening fittings or removing actuator parts.
- Replace damaged diaphragms, seals, gaskets, and restricted hoses; mark line positions and preserve linkage alignment during disassembly.
- Prevent repeat failures with dry compressed air, winter-rated seals, scheduled leak checks, and required AAR/FRA brake testing.
Spot WABCO Brake Diaphragm Failure Signs
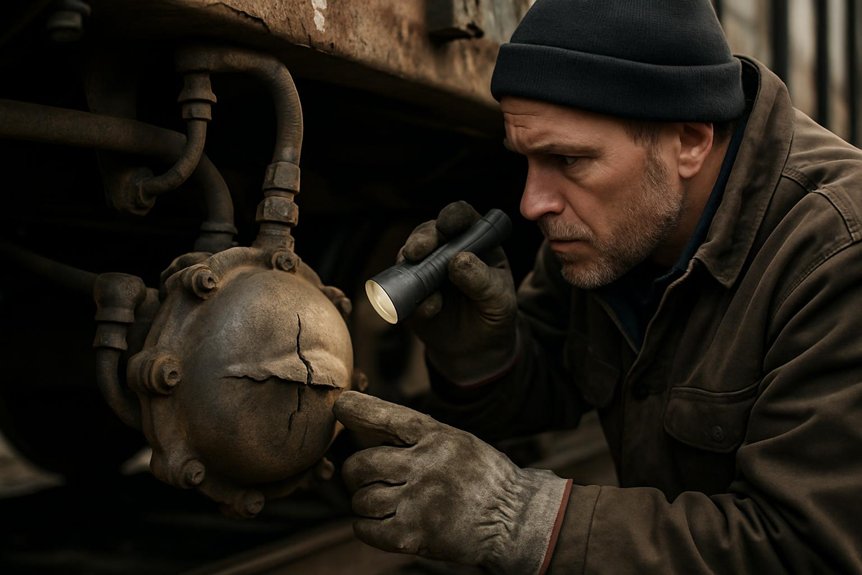
How can you spot a failing WABCO brake diaphragm before it compromises locomotive stopping force? Start with symptoms during service brake application. Listen for hissing near brake chambers or exhaust ports when brakes are applied. Verify audible air paths safely, without disassembling test fittings.
During service braking, hissing near chambers or exhaust ports can signal diaphragm leakage before stopping force drops.
Note whether the compressor cycles excessively during braking. Check if reservoir pressure fails to stabilize through the brake cycle. These signs may indicate diaphragm leakage or related air loss.
Inspect brake chamber corrosion around clamps, pushrod openings, and mounting faces. Rust distortion can increase seal stress and accelerate diaphragm failure. Watch cab brake warnings, pressure imbalance codes, and pneumatic system alerts. Multiple warnings may suggest cascading air-loss conditions.
During depot checks, confirm slack adjustment basics. This helps ensure delayed engagement is not caused by excessive stroke. Treat sluggish brake response, weak emergency braking, or delayed deceleration as diaphragm risk. This is especially important after high-heat duty or heavy braking.
Review hose routing near brake chambers for abrasion and wear. Damaged hoses can mask chamber-related symptoms. Grinding or creaking during application requires immediate attention. Isolate the affected axle and schedule brake chamber inspection promptly.
Confirm Diaphragm Failure With Leakage Tests
Before condemning a WABCO brake diaphragm, confirm leakage through controlled locomotive brake pipe leakage testing.
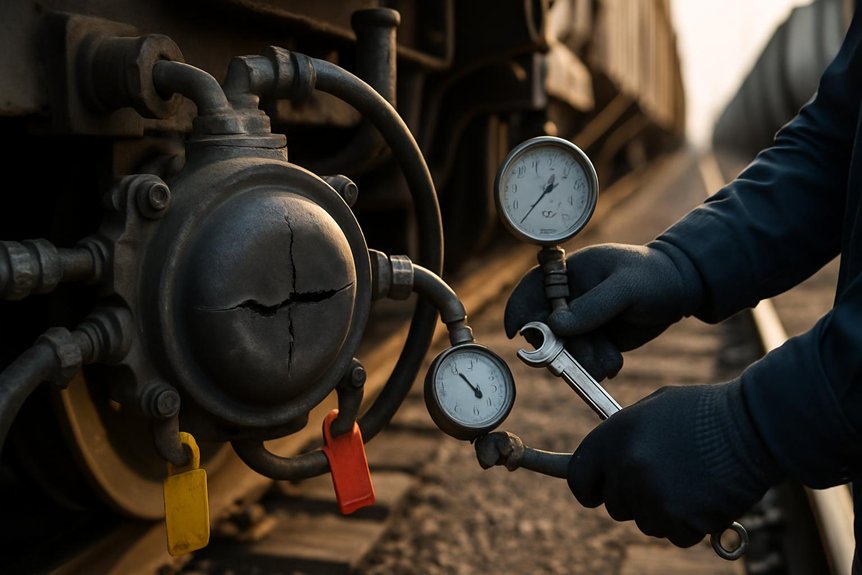
Charge the air brake system to operational pressure. Confirm rear pressure is within 15 psi of that value. It must not be below 75 psi.
Position angle cocks and cutout cocks correctly. Inspect hoses for kinks, binding, fouling, or restrictions.
Make a 20-psi brake pipe service reduction. Wait 45 to 60 seconds, then lap the brake valve.
Verify cutout before timing leakage. Include the pressure-maintaining feature in this verification.
Read the locomotive brake pipe gauge. Confirm rear-end drop with a hand gauge or end-of-train device.
Leakage must not exceed 5 psi per minute during a Class I test.
Use airflow as an alternate method on qualified 26-L or equivalent locomotives. Keep flow at or below 60 cubic feet per minute. With distributed power or an air repeater controlling air from two or more locations, combined flow must not exceed 90 cubic feet per minute.
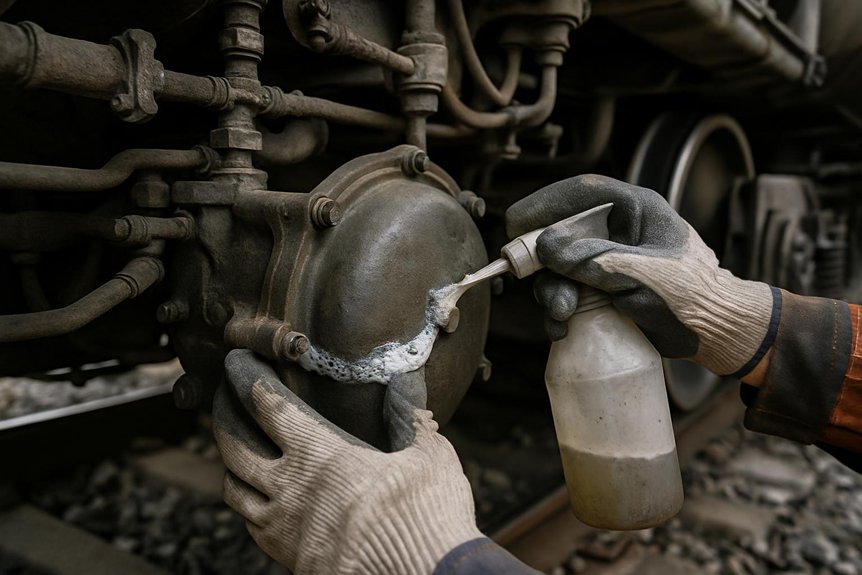
Document the test method clearly. Use soap suds or approved leakage apparatus to isolate the diaphragm leak.
Address Brake Diaphragm Pressure Loss Safely
At the earliest indication of locomotive brake diaphragm pressure loss, isolate the affected pneumatic circuit. Treat the system as energized until proven safe.
Use approved procedures to close supply paths, vent trapped air, and prevent unintended recharge. Apply lockout tagout before loosening fittings, removing covers, or touching actuator hardware.
Confirm zero pressure with a calibrated gauge. Record the reading in the required maintenance documentation. Do not proceed until written verification confirms complete discharge.
Verify zero pressure using calibrated equipment, document the reading, and wait for written discharge confirmation before continuing.
Check leakage limits as specified for locomotive brake systems. Main reservoir loss must average no more than 3 psi per minute. This applies during a three-minute test after a 40% pressure reduction.
Brake pipe leakage must stay at or below 5 psi per minute. Test after a 10 psi reduction from at least 70 psi. In a 2019 loaded grain train occurrence, inadequate sustained braking in extreme cold preceded a runaway derailment.
Mark supply and exhaust line positions before disconnection. Release linkages only after preserving tension and alignment.
Before reassembly, verify torque equipment calibration. This ensures fastening loads meet the required specification.
Prevent Cold-Weather Diaphragm Leakage

When ambient temperature drops below 10°F, treat brake diaphragm leakage as a cold-weather reliability risk. It is not a minor nuisance. Cold stiffens gaskets, diaphragms, and flange seals in locomotive brake systems. Service-worn brake systems may demand far more airflow. They can also lose brake cylinder pressure faster during extended applications.
Start with preventive replacement before severe winter service. Install winter-rated gaskets, seals, filters, and airline accessories. Do not reuse compressed, hardened, or cracked components. Verify locomotive compressors deliver clean, dry air. Moisture can accelerate freezing and leakage at pipe connections. Replace poor-performing brake cylinders with new or refurbished units. Take action when cold tests show abnormal flow demand.
Schedule pre-trip seal checks for diaphragms, flanges, and pipe connections. Pay extra attention before mountain routes or long-grade service. Use ultrasonic leakage detection where available. It can locate small cold-opened leaks before they become critical. Research on freight rail airbrakes presents ultrasonic leakage detection as an alternative to the soap and bubble test. Train locomotive crews on safe cold-weather handling. During severe conditions, use approved hand brake procedures for securement.
Follow AAR and FRA Leakage Test Rules
Cold-weather leak prevention works only when tests follow AAR and FRA rules for locomotive brake systems. Perform single-car air brake testing by interval. Use 12 months for manual S-486 tests. Use 24 months for automated S-4027 tests. Use 48 months for four-pressure S-4027 Section 13.0 tests. Test at 90 psi with qualified personnel. Follow 49 CFR § 232.305 procedures. Perform a single-car air brake test on each new or rebuilt car before placing or using it in revenue service.
Hold brake cylinder leakage for at least five minutes after a full-service application. Keep cylinder communication closed during the hold period. Use the gauge method with horizontal-or-higher pressure taps. Install new taps that comply with S-4020. Check brake pipe leakage after a 10-pound reduction from at least 70 psi. Leakage must not exceed 5 psi per minute. Limit main reservoir leakage to a 3 psi average over three minutes.
Trigger required tests after cylinder, hose, reservoir, valve, or pipe bracket work. Also test after wheel defects or missing brake-system records. Document all test interval tracking. Ensure Umler reporting within 24 hours after repair completion.
Frequently Asked Questions
How Long Does a Freight Brake Diaphragm Typically Last?
A freight brake diaphragm typically lasts around 736 days under normal locomotive operating conditions. Rubber life depends on air quality and maintenance discipline.
Inspection intervals vary by brake system type. Check WABCO systems every 368 days. Inspect DMU filtration systems every 500 days. For 26-C systems with air dryers, inspect every 1,840 days.
You can extend service life by controlling moisture, heat, and contamination. Clean, dry compressed air protects the diaphragm from early aging.
Watch for common failure signs during locomotive brake inspections. These include cracking, hardening, sludge, leakage, and slow brake response.
Replace the diaphragm before brake pressure drops to 60–70 PSI within minutes. Do not wait for complete brake failure. Mikura International supports reliable locomotive brake maintenance with quality-focused supply solutions.
Can Brake Diaphragms Be Rebuilt Instead of Replaced?
Usually, locomotive brake diaphragms should not be rebuilt. Replace them when torn, degraded, delaminated, or structurally compromised. During brake diaphragm inspection, verify housing condition, clamp integrity, corrosion, pitting, and shell distortion. For rebuild versus replace decisions, follow locomotive maintenance practices. Service only minor external issues temporarily, and never seal ruptures. Use diaphragm troubleshooting steps to isolate leaks and confirm pressure retention. Replace the chamber section if containment integrity is doubtful.
What Materials Are Freight Brake Diaphragms Made From?
Freight brake diaphragms use rubber compounds suited for locomotive braking systems. Common materials include NR, EPDM, NBR, neoprene, and reinforced FKM. The choice depends on heat, oil, ozone, and chemical exposure.
Most diaphragms include fabric mesh molded into the rubber. This reinforcement controls stretch and prevents ballooning under pressure. It also helps maintain sealing geometry during repeated brake cycles.
Neoprene layers can improve durability in changing locomotive operating conditions. Reinforced compounds are preferred for high flex-cycle demands and harsh service environments.
Material selection should consider pressure rating, contamination exposure, and service temperature. Compliance with relevant railway brake standards should also guide the final choice.